Luckily, macOS has a built-in app called Automator, which allows users to automate tasks by creating ‘workflows’ using a simple drag and drop interface. With this app, users can script their own actions and let their Mac perform the daily mundane tasks for them. Some of the tasks you can automate include converting HEIF images to JPEG, batch converting images, renaming multiple files, and more. So let’s dive in and see how to automate image resizing on macOS using Automator.
Steps to create an image resizing service
First, launch the Automator app by going into Finder > Applications > Automator, or opening Launchpad and then searching for Automator.
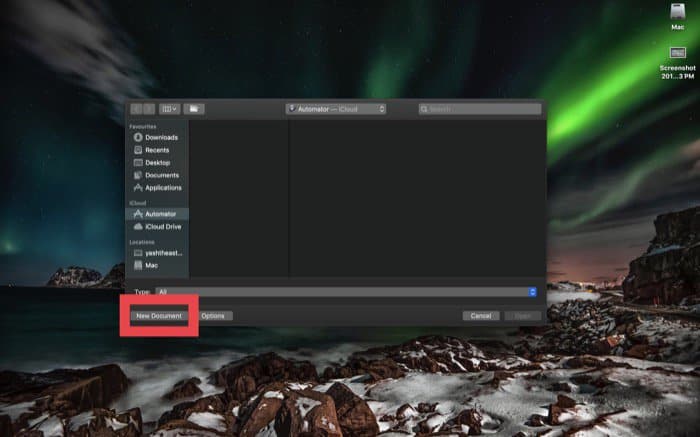
On the next screen, click New Document, select Quick Action on the following screen, and hit Choose.
Now, on the right pane, beside the Workflow receives current option, select image files.
Next, on the left pane, select the Actions tab and in the search bar (next to Variables), search for ‘Get Specified Finder Items’ and drag it to the workflow area on the right.
Now, search for ‘Scale Images’ again in the search bar and drag it below the previous item.
The Automator app will prompt you to ‘add a Copy Finder Items action so that the copies are changed and your originals are preserved’. Click Don’t Add. Although you can opt for this option, to keep this workflow simple, we are not going to add it.
Next, under the Scale Images item, click on the drop-down to change the size by percentage or in pixels, and then, add the value that you want to resize your images to.
Now, save the file using command + s or by going to the app menu > File > Save and entering the name in the pop-up menu. For future references, let’s call the file ‘Resize Image’. That’s it. You now have a service to resize images for you.
But how do you run it?
Well, it’s as easy as a few clicks. Say you want to resize an image. With the service that we just created, all that you need to do is go to the folder where the image is stored, select and right-click on it, and at the bottom, select Services > Resize Image (the name you gave to the service). Additionally, you can also use this service to resize multiple images in one go.
You should now have a resized image with the size that you specified earlier.
Feeling lazy? Want to avoid those clicks?
Well, you’re lucky! macOS allows users to create custom shortcuts for performing various actions across the operating system. So, now that we have created a service to automate image resizing on macOS, let’s create a shortcut to execute it quickly.
Steps to create a shortcut
Launch System Preferences. Click the Apple icon on the top menu bar > System Preferences or hit command + space and search for ‘System Preferences’ from there.
On the next screen, select Keyboard and tap on Shortcuts from the options on the top.
Now, select Services on the left pane.
Next, you will see a list of various services (and also the service that you just created) in the right pane. Here select your service and click on Add Shortcut.
Finally, assign a key combination that you want and can easily remember. It can be anything, control + command + r or even, as simple as, command + q. But make sure that the key combination is not already in use for any other service. Now, every time you need to resize an image, all you need to do is select the image and click the key combination to resize your image. That’s it! Have fun with your service and tinker around for more customization. Happy Automation!


